概述
通过CocoaPods来管理项目的依赖关系可以说是iOS开发的基本入门技能了。使用CocoaPods管理有如下几个好处:
- 避免了同一个第三库在不同项目之间的复制粘贴,第三方库升级以后,只需要更新Podfile即可。
- 项目结构更清晰、可以更直观的查看项目依赖的第三方库。
- 可以灵活的指定第三库的版本、分支。方便项目管理。
- 对于移动端的组件化开发的基础,一个公司组件化的成功与失败很大程度上决定于组件的依赖和拆分管理。
既然CocoaPods有这么多好处,我们有必要自己实践一个CocoaPods库的完整封装流程。这篇博客主要分为如下三部:
- CocoaPods库的基本流程
- 私有CocoaPods库的建立和上传
- CocoaPods库的复杂封装
我将通过封装LibAdHub这个功能库并且集成进入NumberTileGame这个ReactNativeDemo来验证整个流程
CocoaPods库的基本流程
- 1 通过
pod lib create LibAdHub创建一个CocoaPods库,在创建过程中有一系列的交互过程
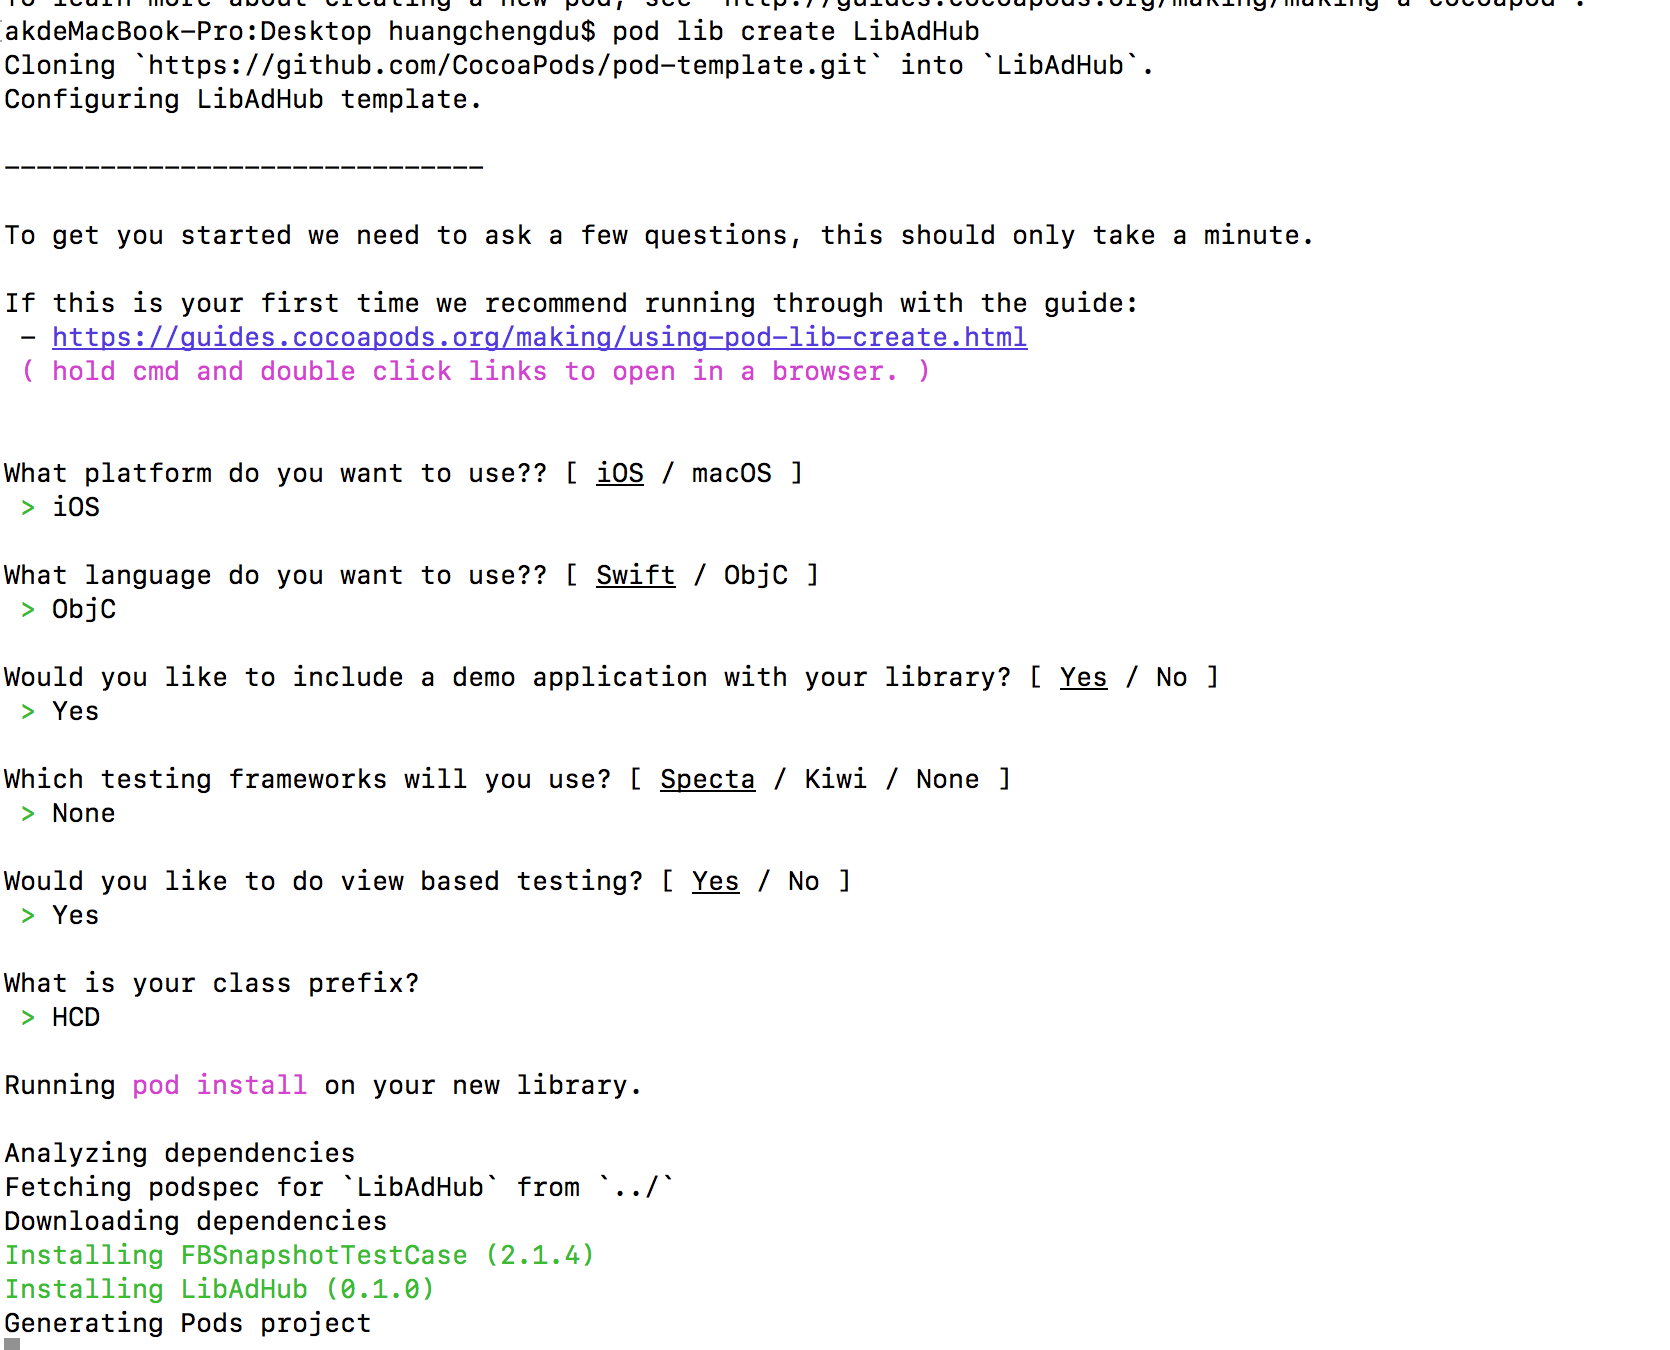
主要就是平台、语言、Demo配置等选择。这个命令运行以后,就会生成一个CocoaPods项目。生成的项目如下图
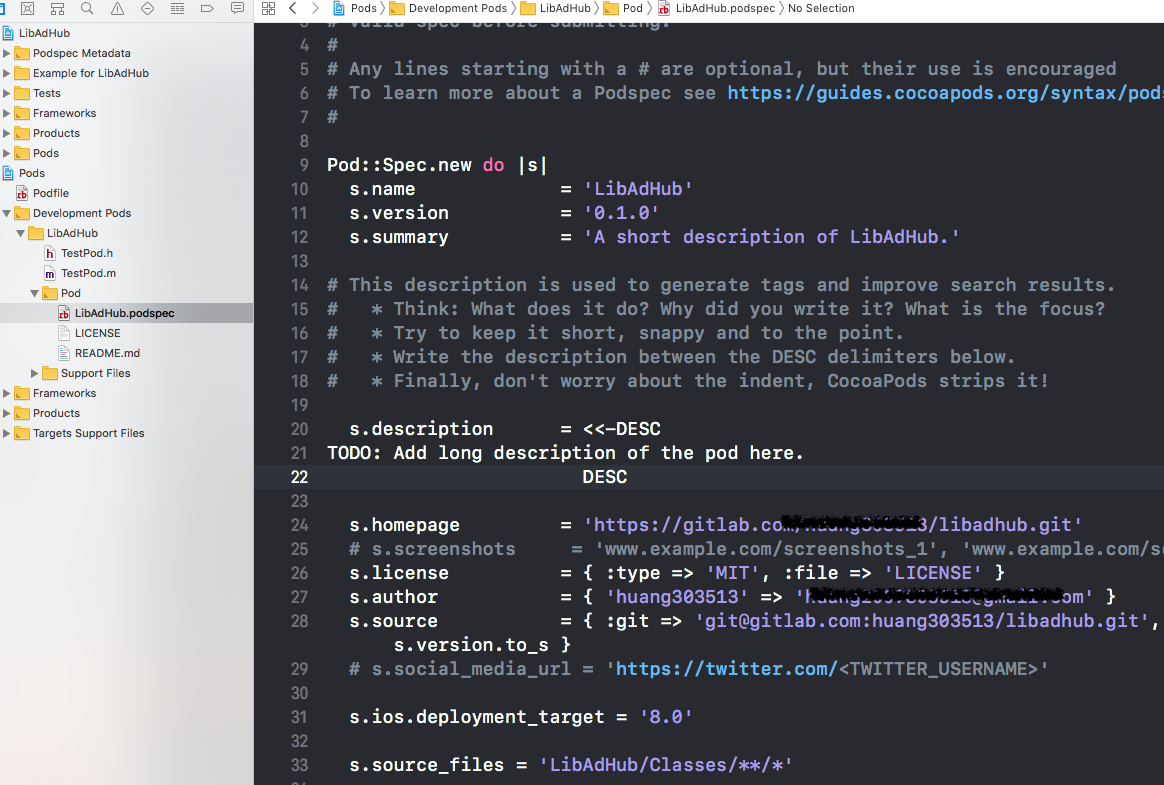
其中最重要的就是CocoaPods项目的名字是LibAdHub,地址是git@gitlab.com:huang303513/libadhub.git。这里只需要给为你需要的地址和名字就可以了。最后我们还需要修改Demo的Podfile
- 2 修改Demo的Podfile
1 | #use_frameworks!//注释 |
这里主要是注释掉#use_frameworks!,因为这个标记表示生成静态库。同时需要注释掉pod 'FBSnapshotTestCase'否则会报错。然后我们进入Example目录通过pod install安装。安装成功以后通过命令pod lib lint来查看是否有错,如果有有警告之类可以尝试消除。进入Demo通过#import <LibAdHub/TestPod.h>引入然后运行,如果没错,则表示CocoaPods库配置成功。然后上传到git仓库git@gitlab.com:huang303513/libadhub.git。在其他地方就可以引入了。
1 | pod 'LibAdHub', :git => 'git@gitlab.com:huang303513/libadhub.git' |
私有CocoaPods仓库的建立和上传
通过上面的步骤以后,我们并不能对LibAdHub指定对应版本,这样如果不同地方依赖不同版本的LibAdHub以后,就会导致问题。我们接下来会新建一个私有CocoaPods库并且把我们的私有库上传。
1 打Tag上传
通过
pod lib lint --allow-warnings来验证文件1
2
3
4
5
6
7
8
9
10akdeMacBook-Pro:LibAdHub huangchengdu$ pod lib lint --allow-warnings
-> LibAdHub (0.1.0)
- WARN | source: Git SSH URLs will NOT work for people behind firewalls configured to only allow HTTP, therefore HTTPS is preferred.
- NOTE | xcodebuild: note: Using new build system
- NOTE | [iOS] xcodebuild: note: Planning build
- NOTE | [iOS] xcodebuild: note: Constructing build description
- NOTE | [iOS] xcodebuild: warning: Skipping code signing because the target does not have an Info.plist file. (in target 'App')
LibAdHub passed validation.把
LibAdHub.spec文件中的版本号修改:1
2
3
4Pod::Spec.new do |s|
s.name = 'LibAdHub'
s.version = '1.0.0'
s.summary = '这是一个实验的Pod库,我要用它做实验'添加Tag并且push
1
2
3
4
5
6
7akdeMacBook-Pro:LibAdHub huangchengdu$ git tag -m "first release" "1.0.0"
akdeMacBook-Pro:LibAdHub huangchengdu$ git push --tags
Counting objects: 1, done.
Writing objects: 100% (1/1), 156 bytes | 156.00 KiB/s, done.
Total 1 (delta 0), reused 0 (delta 0)
To gitlab.com:huang303513/libadhub.git
* [new tag] 1.0.0 -> 1.0.0
2、 私有CocoaPods仓库建立和上传
- 在gitlab下新建一个仓库
git@gitlab.com:huang303513/wshspecs.git。 - 执行
pod repo add wshSpecs git@gitlab.com:huang303513/wshspecs.git。这样就会在本地/Users/huangchengdu/.cocoapods/repos下建立一个wshSpecs的私有Pod仓库。 - 执行
pod repo push wshSpecs LibAdHub.podspec把LibAdHub放到私有仓库中。
- 在gitlab下新建一个仓库
   1
2
3
4
5
6
  akdeMacBook-Pro:repos huangchengdu$ pwd
/Users/huangchengdu/.cocoapods/repos
akdeMacBook-Pro:repos huangchengdu$ cd wshSpecs/
akdeMacBook-Pro:wshSpecs huangchengdu$ ls
LibAdHub	README.md
akdeMacBook-Pro:wshSpecs huangchengdu$
3、 CocoaPods库的引用
pod search LibAdHub搜索1
2
3
4
5
6-> LibAdHub (1.0.0)
这是一个实验的Pod库,我要用它做实验
pod 'LibAdHub', '~> 1.0.0'
- Homepage: https://gitlab.com/huang303513/libadhub
- Source: git@gitlab.com:huang303513/libadhub.git
- Versions: 1.0.0 [wshSpecs repo]项目引入1
2
3
4
5
6
7
8
9
10
11
12
13
14
15
16
17
18
19
20
21
22
23
24
25
26
27
28
29
30
31
32
33
34
35
36
37
38# Uncomment the next line to define a global platform for your project
source 'https://github.com/CocoaPods/Specs.git'
source 'https://gitlab.com/huang303513/wshspecs.git'
platform :ios, '8.0'
target 'NumberTileGame' do
# Your 'node_modules' directory is probably in the root of your project,
# but if not, adjust the `:path` accordingly
pod 'React', :path => '../rn/node_modules/react-native', :subspecs => [
'Core',
'CxxBridge', # Include this for RN >= 0.47
'DevSupport', # Include this to enable In-App Devmenu if RN >= 0.43
'RCTText',
'RCTImage',
'RCTNetwork',
'RCTWebSocket', # Needed for debugging
'RCTAnimation',
'RCTLinkingIOS',# react-navigator需要
# Needed for FlatList and animations running on native UI thread
# Add any other subspecs you want to use in your project
]
# Explicitly include Yoga if you are using RN >= 0.42.0
pod 'yoga', :path => '../rn/node_modules/react-native/ReactCommon/yoga'
pod 'RNVectorIcons', :path => '../rn/node_modules/react-native-vector-icons'#添加字体
# Third party deps podspec link
pod 'DoubleConversion', :podspec => '../rn/node_modules/react-native/third-party-podspecs/DoubleConversion.podspec'
pod 'glog', :podspec => '../rn/node_modules/react-native/third-party-podspecs/glog.podspec'
pod 'Folly', :podspec => '../rn/node_modules/react-native/third-party-podspecs/Folly.podspec'
# pod 'LibAdHub', :git => 'git@gitlab.com:huang303513/libadhub.git'
pod 'LibAdHub', '1.0.0'
end
target 'NumberTileGameTests' do
inherit! :search_paths
# Pods for testing
end
CocoaPods库的复杂封装
上面仅仅是做了一个最简单的库,真正在集成一个库的时候可能面临如下几个问题:
库本身依赖很多其他库,然而其中一部分库需要集成进来的库在APP中已经存在,如
AFNetworking,Masonry不能集成进来,否则APP会重复引用。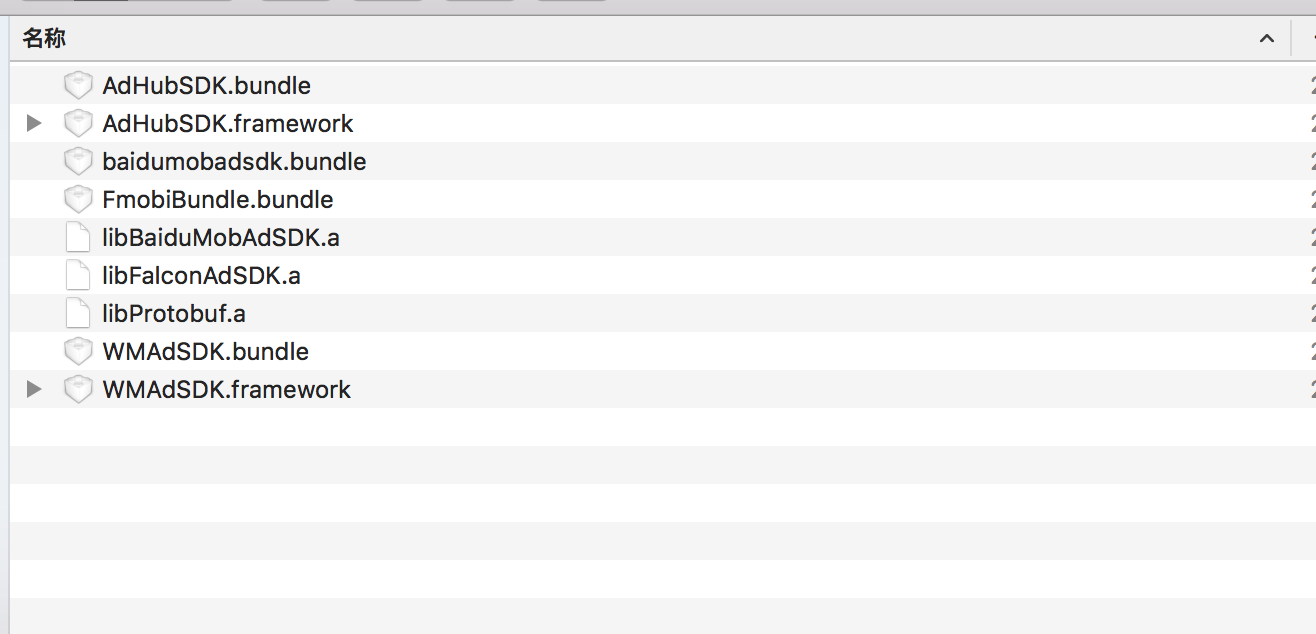
依赖的系统库很多,为了减低耦合性,我们不能修改APP对于系统库的依赖。
针对上面的情况,我们需要一步一步封装SDK
1 添加对应文件夹,把所有依赖库放入里面,然后加入项目
2 编辑
LibAdHub.podspec文件,添加对应的库依赖。通过``1
2
3
4
5
6
7
8
9
10
11
12
13
14
15
16
17
18
19
20
21
22
23
24
25
26
27
28
29
30
31
32
33Pod::Spec.new do |s|
s.name = 'LibAdHub'
s.version = '1.2.0'
s.summary = '这是一个实验的Pod库,我要用它做实验。呵呵呵'
s.description = '呵呵呵呵呵呵呵呵呵呵呵呵呵'
s.homepage = 'http://gitlab.com/huang303513/libadhub'
# s.screenshots = 'www.example.com/screenshots_1', 'www.example.com/screenshots_2'
s.license = { :type => 'MIT', :file => 'LICENSE' }
s.author = { 'huang303' => 'huang2@gmail.com' }
s.source = { :git => 'git@gitlab.com:huang303513/libadhub.git', :tag => s.version.to_s }
# s.social_media_url = 'https://twitter.com/<TWITTER_USERNAME>'
s.ios.deployment_target = '8.0'
s.source_files = 'LibAdHub/Classes/**/*'
# # subspec, 将没有 Pod 版本的第三方库依赖做为 subspec.
s.subspec 'libAdHub' do |ss|
ss.vendored_libraries = 'LibAdHub/Vender/libAdHub/*.a'
ss.vendored_frameworks = 'LibAdHub/Vender/libAdHub/*.framework'
ss.resource_bundles = {'libAdHub' => [
'LibAdHub/Vender/libAdHub/AdHubSDK.bundle',
'LibAdHub/Vender/libAdHub/baidumobadsdk.bundle',
'LibAdHub/Vender/libAdHub/FmobiBundle.bundle',
'LibAdHub/Vender/libAdHub/WMAdSDK.bundle']
}
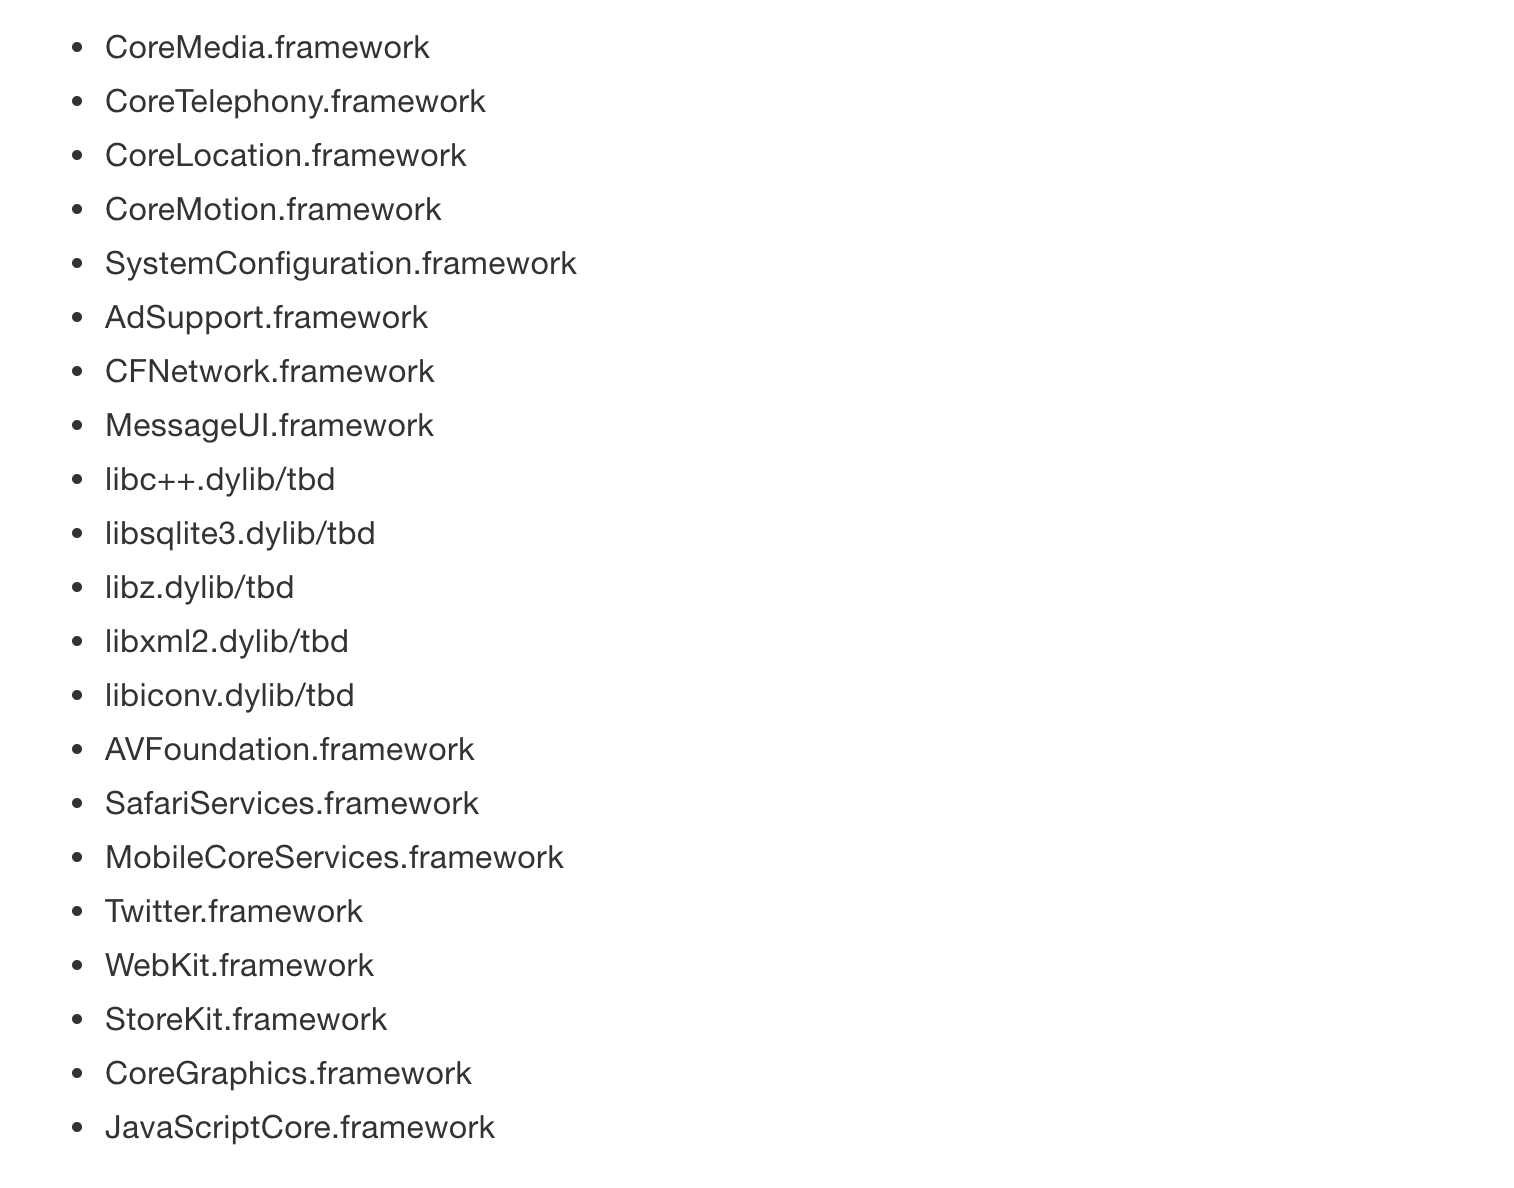
ss.frameworks = 'AVFoundation', 'CoreMedia', 'CoreTelephony', 'CoreLocation', 'CoreMotion', 'SystemConfiguration', 'AdSupport', 'CFNetwork', 'MessageUI', 'SafariServices', 'MobileCoreServices', 'Twitter', 'WebKit', 'StoreKit', 'CoreGraphics', 'JavaScriptCore'
ss.libraries = 'xml2', 'iconv', 'z', 'sqlite3', 'c++'
end
s.dependency 'AFNetworking', '~> 3.1.0'
s.dependency 'Masonry', '~> 1.1.0'
end3 运行命令
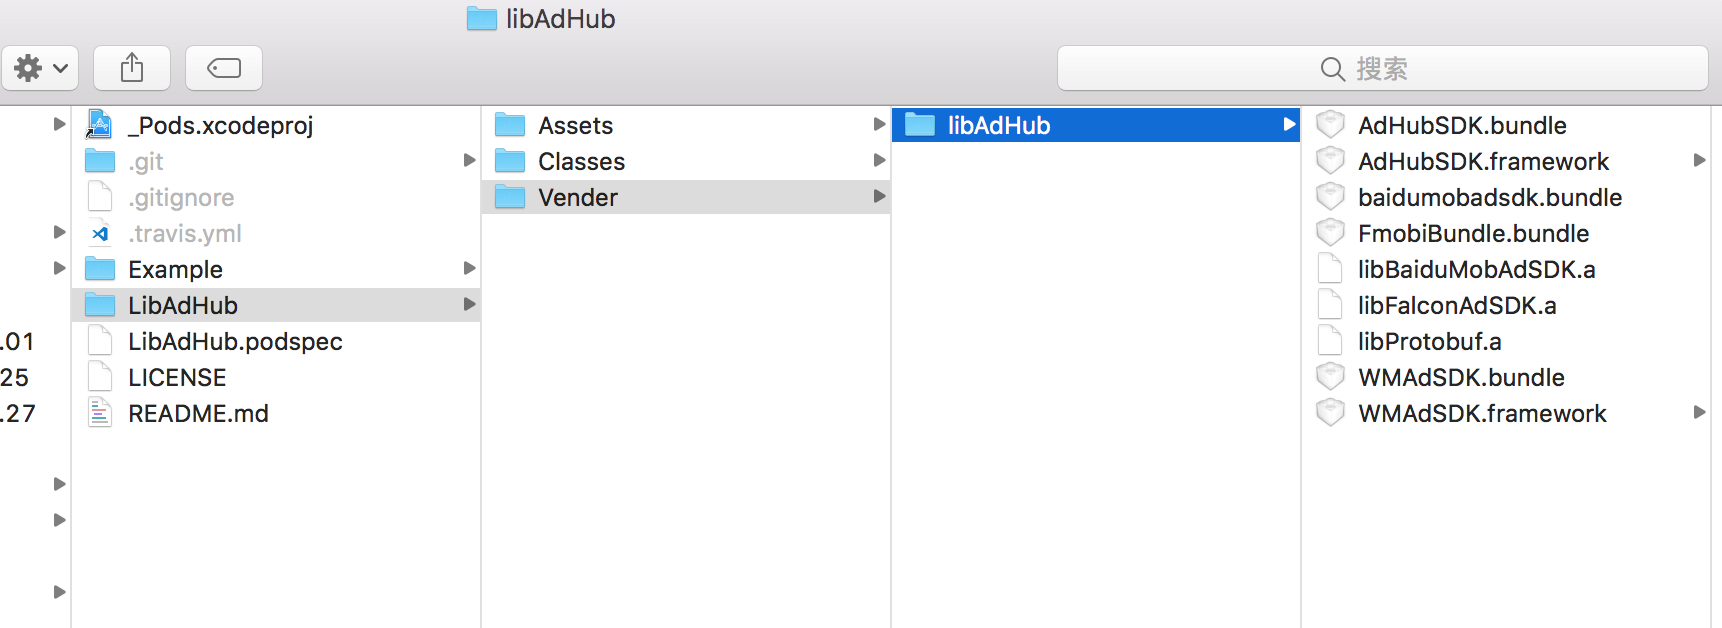
pod lib lint --allow-warnings --verbose直到编译通过。最终项目结构如下: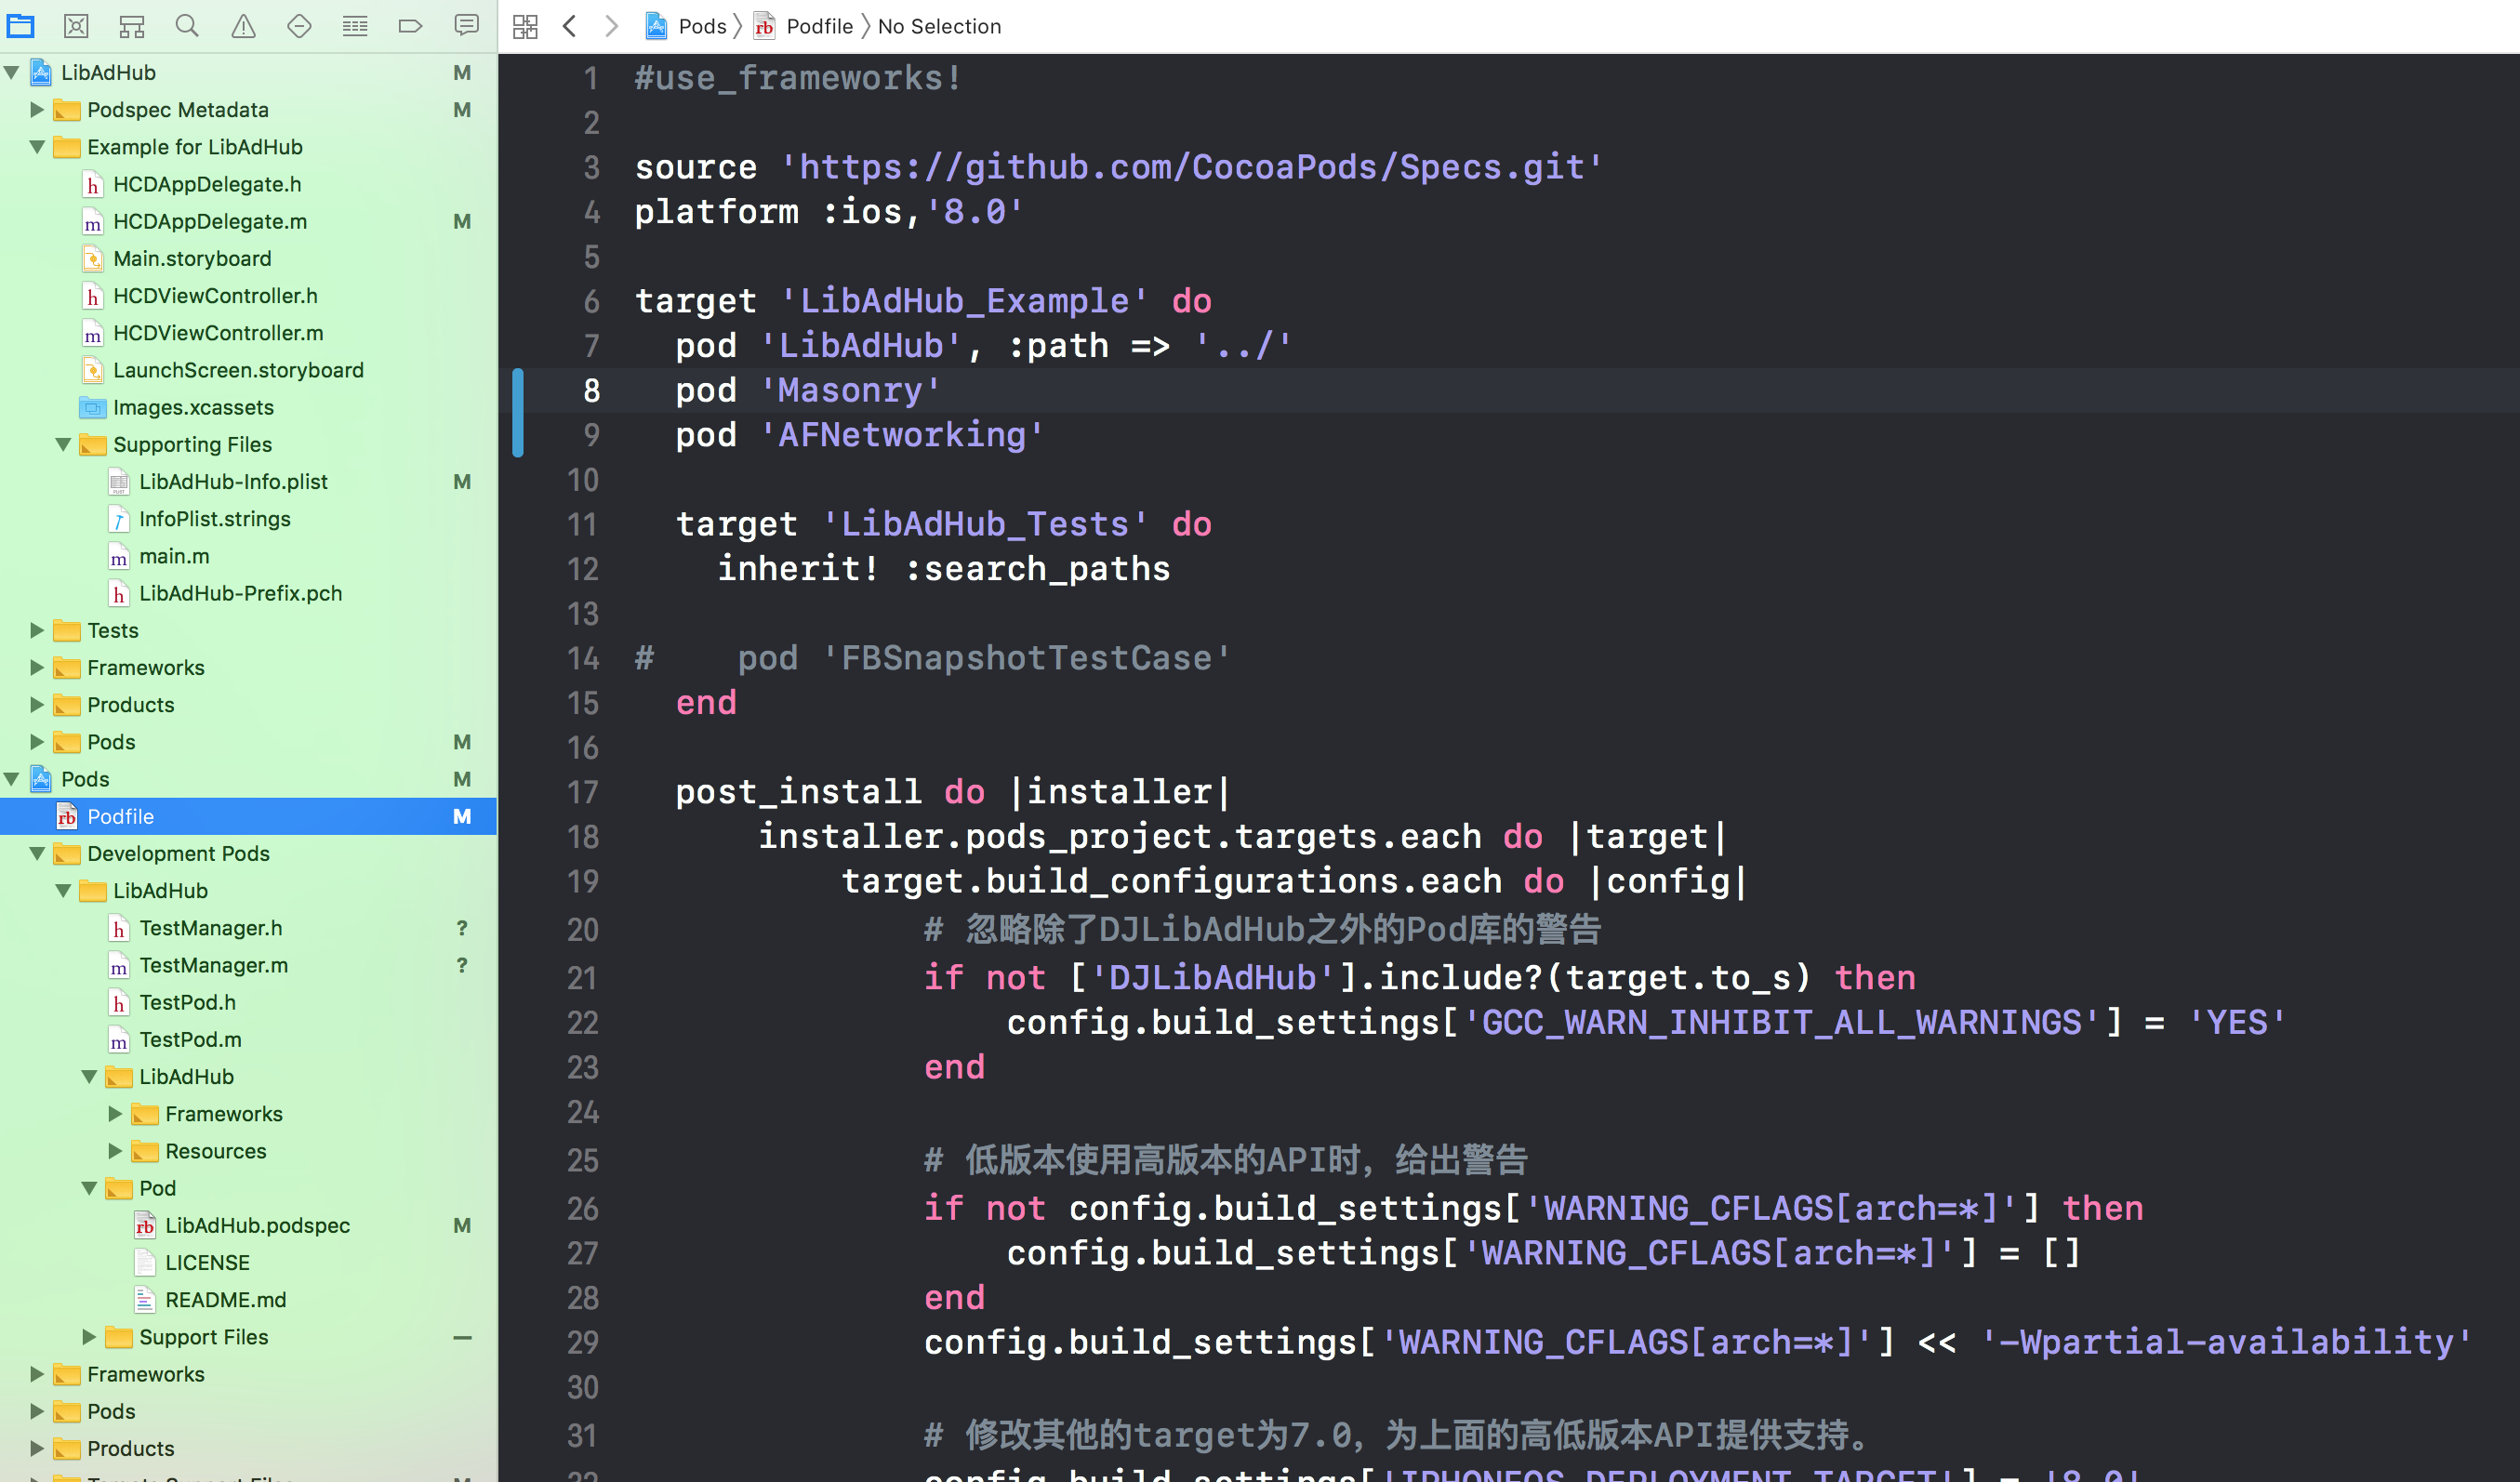
4 最后一步。进入
Example目录,运行pod install来验证封装的正确性。在LibAdHub.podspec中把版本号改为1.3.0。然后push就大功告成了。1
2
3
4
5
6
7
8
9
10
11localhost:Example huangchengdu$ pod install
Analyzing dependencies
Fetching podspec for `LibAdHub` from `../`
Downloading dependencies
Using AFNetworking (3.2.1)
Using LibAdHub (1.1.0)
Using Masonry (1.1.0)
Generating Pods project
Integrating client project
Sending stats
Pod installation complete! There are 3 dependencies from the Podfile and 3 total pods installed.5 然后打tag。上传到私有CocoaPods库
打tag
1
2
3
4
5
6
7
8LibAdHub passed validation.
akdeMacBook-Pro:libadhub huangchengdu$ git tag -m "1.3.0版本" "1.3.0"
akdeMacBook-Pro:libadhub huangchengdu$ git push --tags
Counting objects: 1, done.
Writing objects: 100% (1/1), 164 bytes | 164.00 KiB/s, done.
Total 1 (delta 0), reused 0 (delta 0)
To gitlab.com:huang303513/libadhub.git
* [new tag] 1.3.0 -> 1.3.0push到私有库
1
pod repo push wshSpecs LibAdHub.podspec --allow-warnings
pod search LibAdHub查找1
2
3
4
5
6
7
8-> LibAdHub (1.4.0)
这是一个实验的Pod库,我要用它做实验。呵呵呵
pod 'LibAdHub', '~> 1.4.0'
- Homepage: http://gitlab.com/huang303513/libadhub
- Source: git@gitlab.com:huang303513/libadhub.git
- Versions: 1.4.0, 1.0.0 [gitlab-huang303513-wshspecs repo]
- Subspecs:
- LibAdHub/libAdHub (1.4.0)其他地方使用
1
pod install --repo-update

...
...